
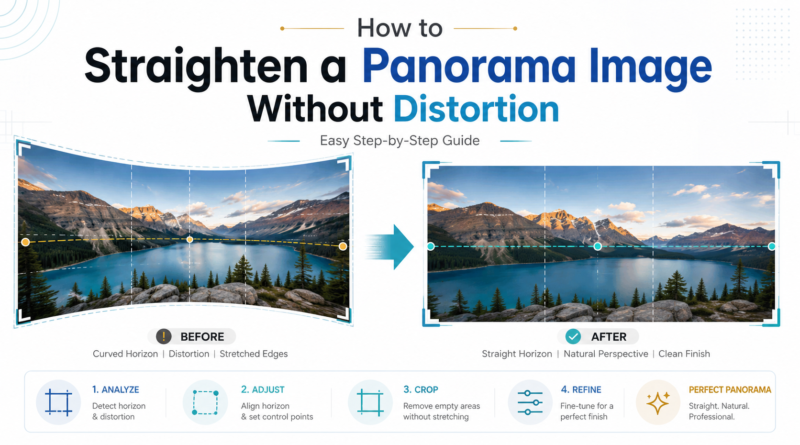
How to Straighten a Panorama Image Without Distortion: Easy Guide
Panorama images are beautiful because they capture a wide view in one frame. They are commonly used in landscape photography, real estate photography, travel photos, architecture images, hotel photos, interior photography, and website banners. But one common problem many people face is that the panorama image looks curved, bent, stretched, or distorted after stitching.
Sometimes the horizon may look like a curve. Buildings may look tilted. The edges may look stretched. The photo may not look natural even if the original scene was straight. This happens because panorama images are created by combining multiple photos or by using a wide camera view, and the software tries to adjust the image into one wide frame.
In this guide, you will learn how to straighten a panorama image without distortion using simple methods. We will explain how to fix panorama images in Photoshop, Lightroom, iPhone, free tools, and online editors. You will also learn which method is easiest and which method gives the best professional result.
For business images, real estate photos, hotel images, product banners, and website visuals, professional correction is always better. You can also get expert support from OURS GLOBAL.
What Is Panorama Distortion?
Panorama distortion means the image does not look naturally straight after it is captured or stitched. Instead of a clean wide image, the photo may look bent or stretched.
Common panorama distortion problems include curved horizons, wavy landscape lines, leaning buildings, stretched corners, bent roads, uneven sea lines, crooked perspective, and warped foreground areas.
This problem is very common in wide-angle photography and stitched panorama images. The wider the image, the more visible the distortion can become.
Why Does a Panorama Image Look Curved?
A panorama image usually looks curved because of camera movement, lens distortion, wrong projection settings, or improper stitching. When several photos are joined together, the software needs to bend and align them. If the camera was not level or the lens created distortion, the final panorama may look unnatural.
Camera Was Not Level
If the camera is tilted upward or downward while taking the panorama, the final image may show a curved horizon. Even a small tilt can create a visible curve in wide images.
Wide-Angle Lens Distortion
Wide-angle lenses capture more area, but they can stretch the sides of the image. When multiple wide-angle shots are stitched together, the distortion becomes more visible.
Wrong Panorama Projection
Panorama software uses different projection modes such as Perspective, Cylindrical, Spherical, Mercator, and Rectilinear. Each projection changes the way the image is displayed. If the wrong projection is selected, the panorama may look curved or stretched.
Poor Image Overlap
When creating a panorama from multiple photos, each photo should overlap with the next photo. If there is not enough overlap, the stitching software may not align the images correctly.
Moving Objects in the Scene
People, vehicles, waves, trees, clouds, or animals can move between shots. This can create stitching errors and distortion.
Handheld Panorama Shooting
Handheld panoramas are easy, but they are not always accurate. A tripod helps keep the camera level and reduces distortion.
Best Way to Straighten a Panorama Image Without Distortion
The best way is to correct the image step by step. Do not simply rotate and crop the image. That may fix the horizon, but it can also cut important parts or create new distortion.
A good workflow is to check the type of distortion, apply lens correction, choose the correct projection method, straighten the horizon, fix perspective issues, correct curved areas, crop carefully, fill empty corners if needed, and export in high quality.
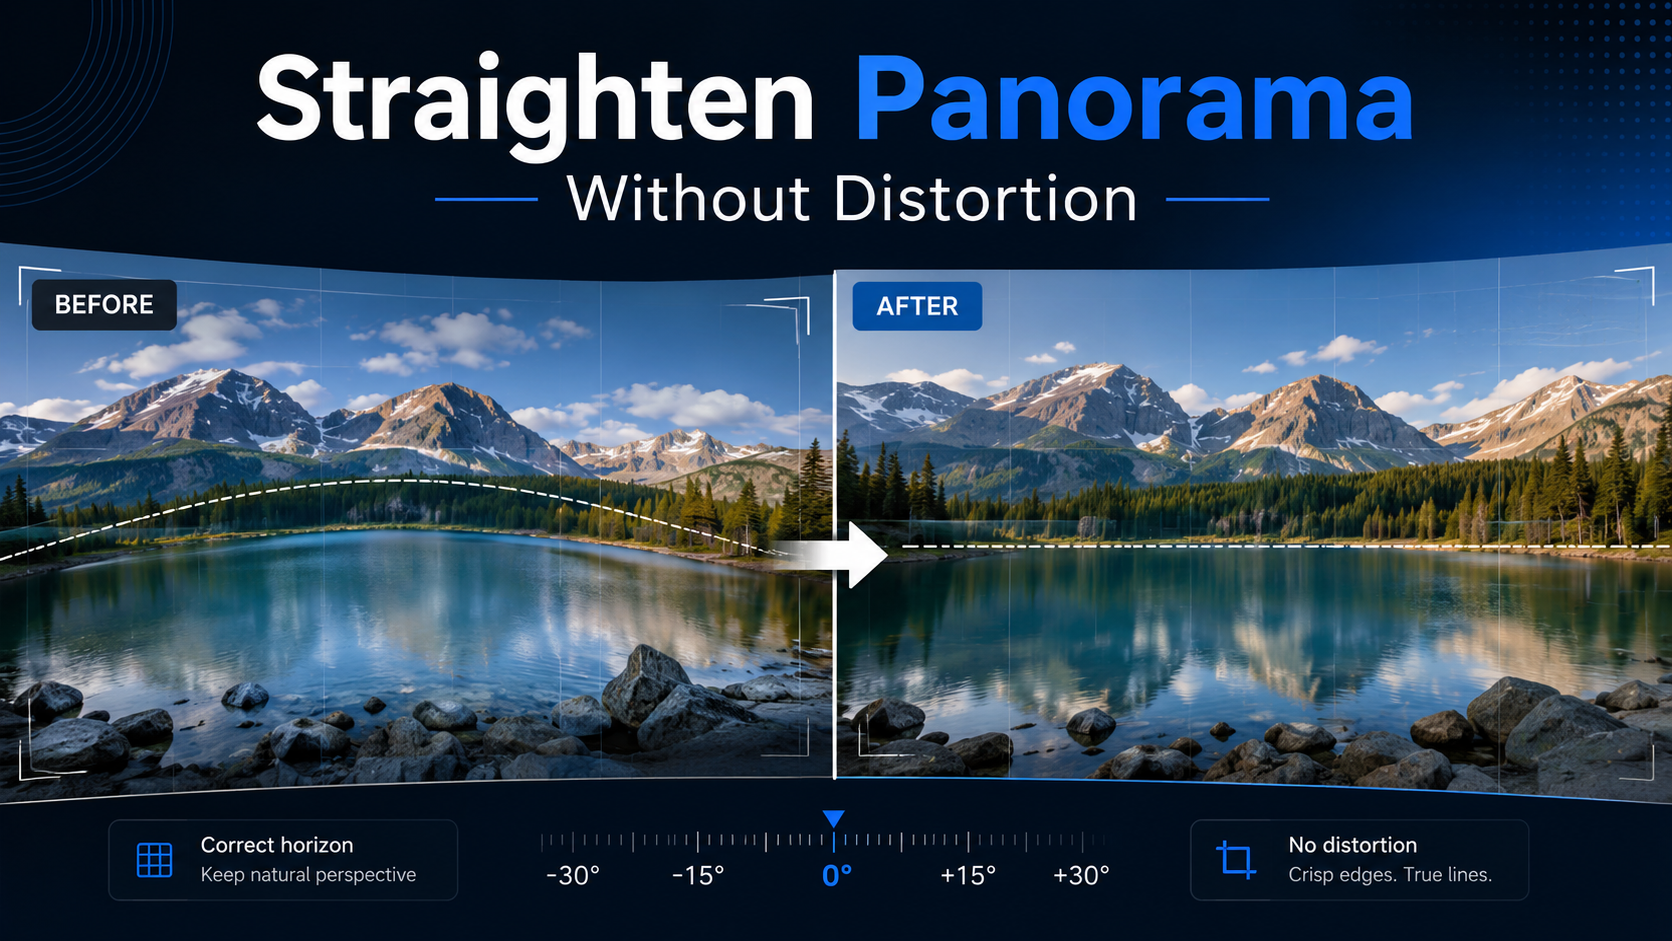
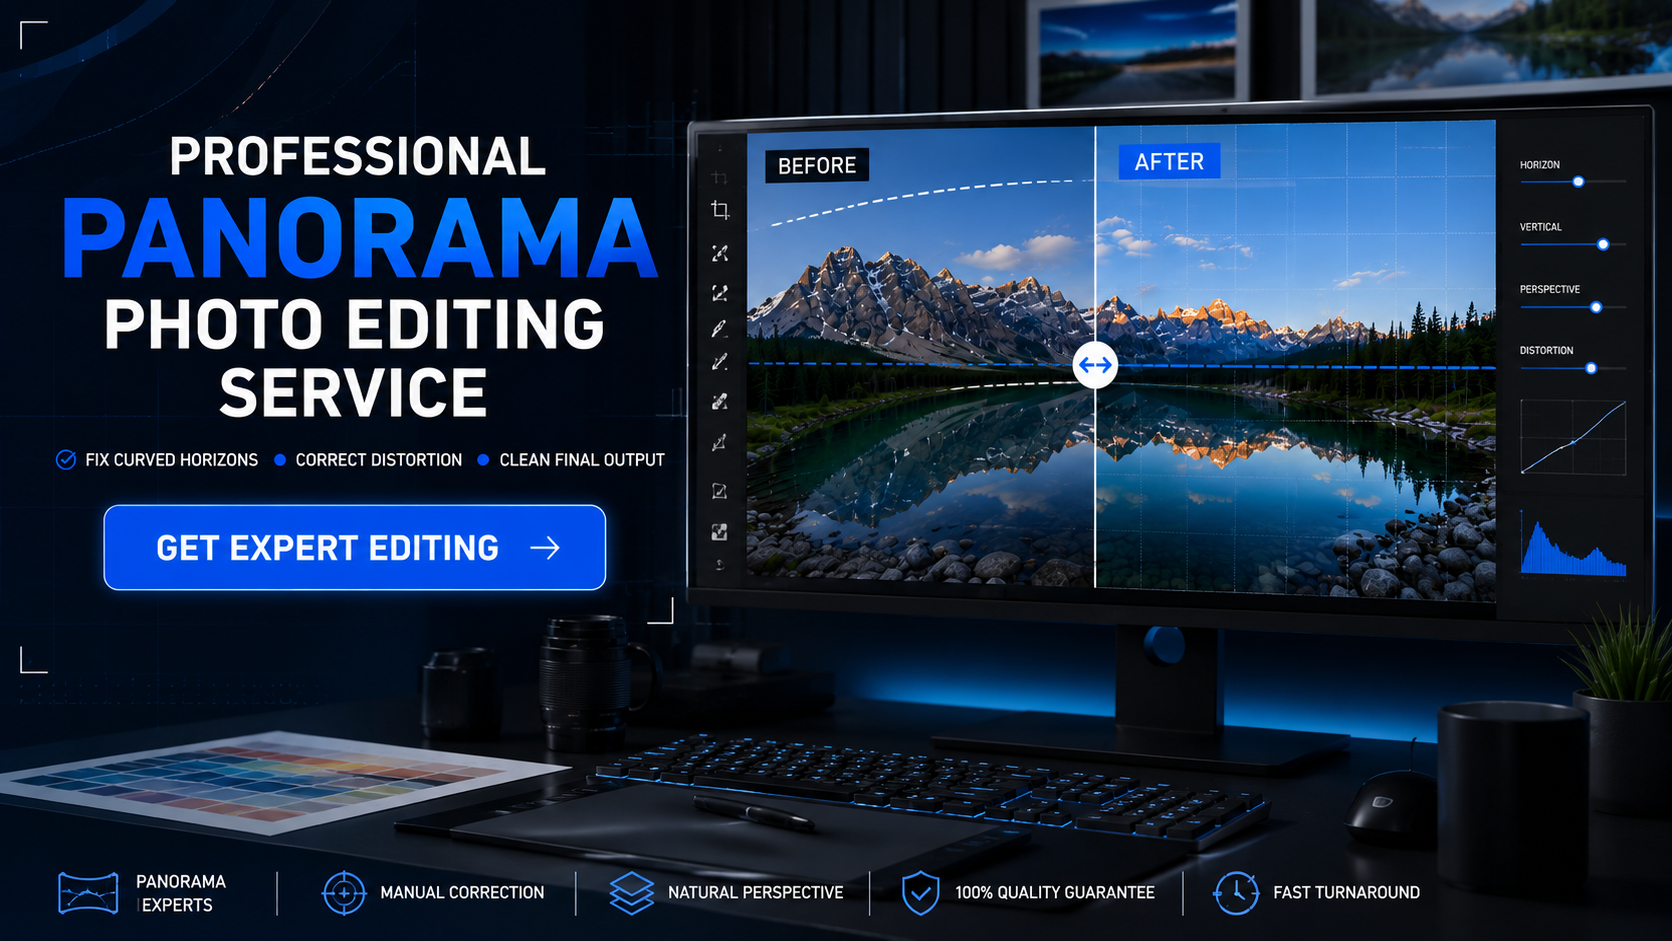
Before and After Panorama Correction
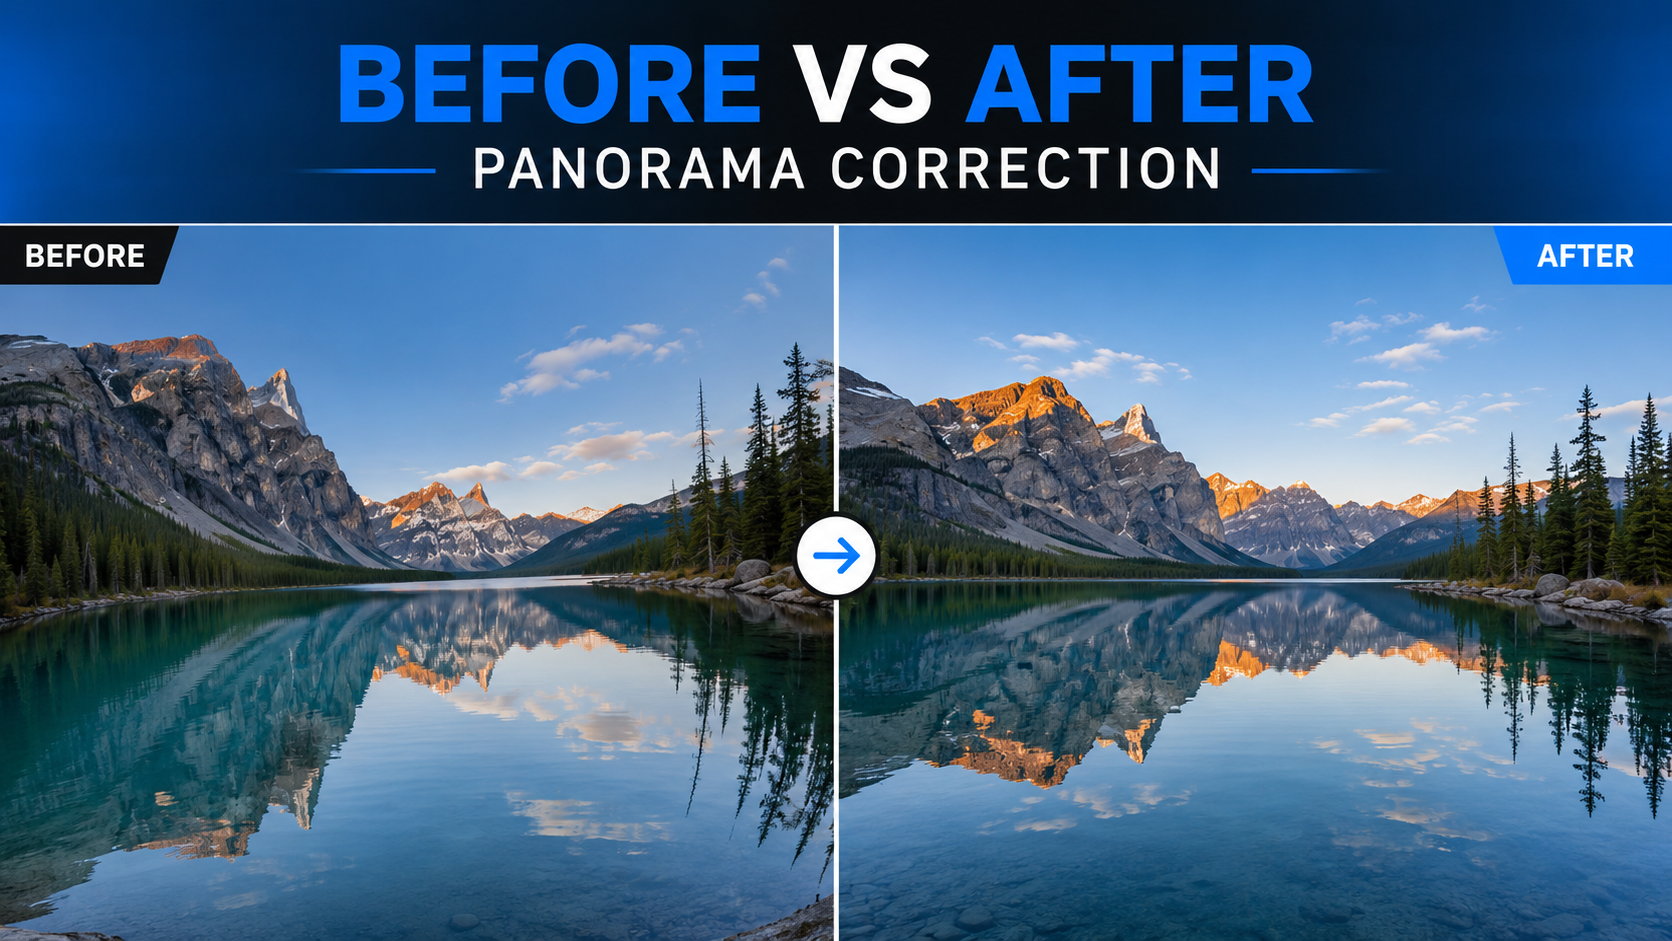
A before and after comparison is one of the best ways to understand panorama correction. In the before image, you may notice that the horizon is curved, the image corners are stretched, buildings or trees are leaning, and the image does not feel balanced.
In the after image, the photo should look straight, balanced, natural, clean, professionally cropped, and ready for website or marketing use.
For commercial images, always compare the corrected photo with the original. This helps you avoid over-editing.
How to Straighten a Panorama Image in Photoshop
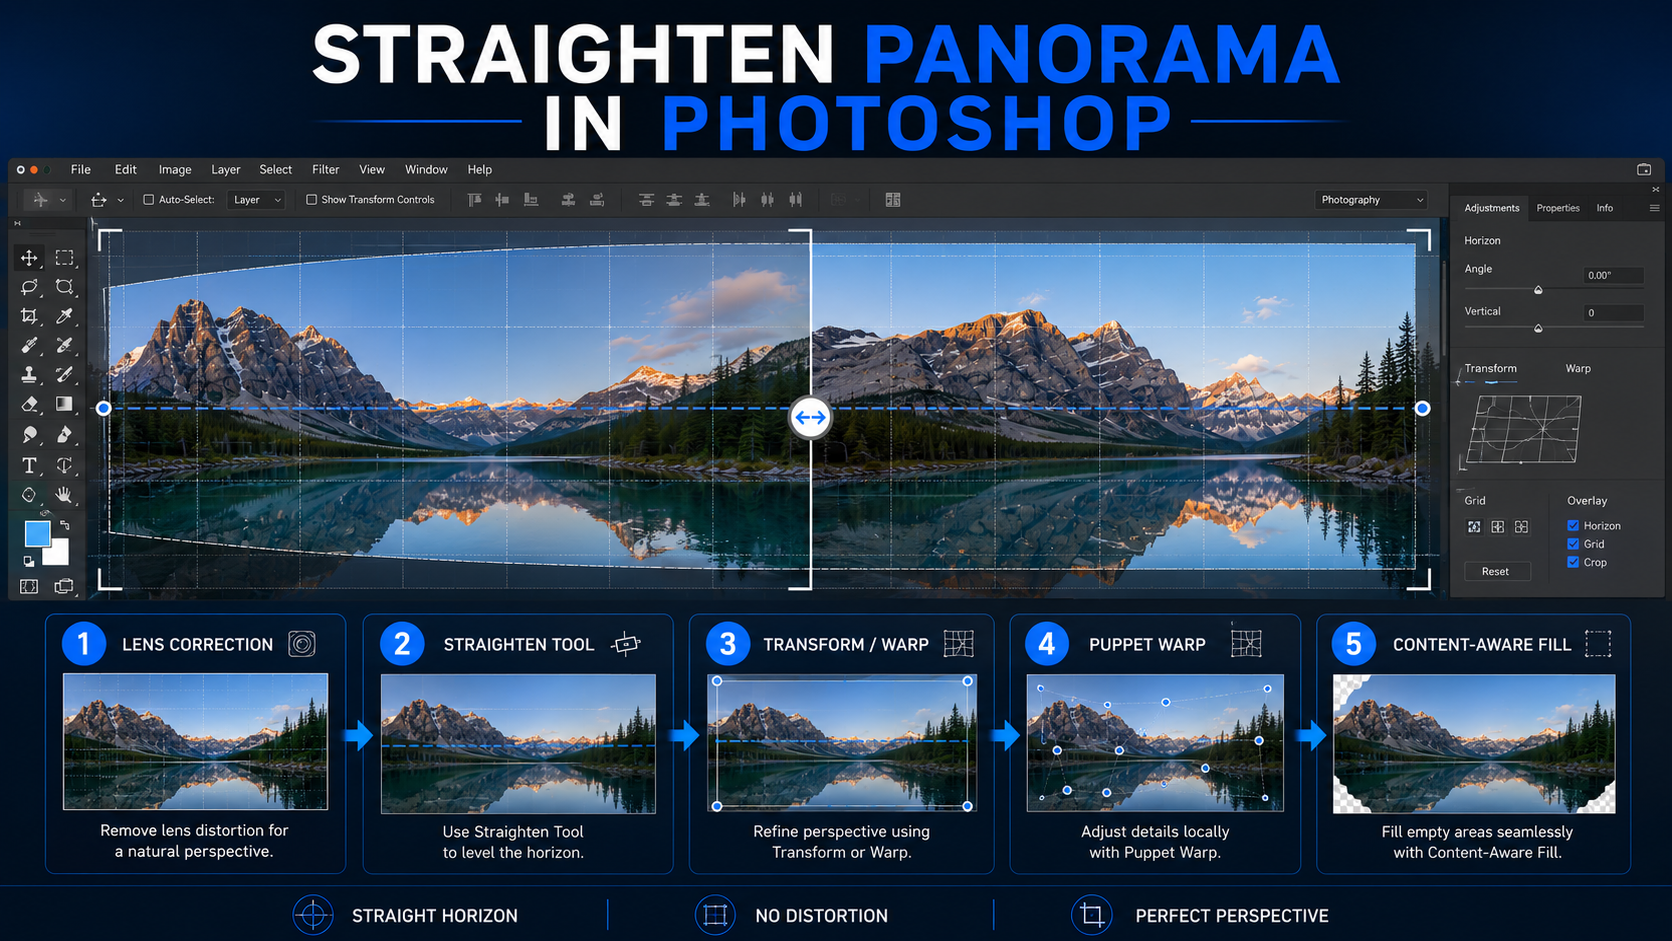
Photoshop is one of the best tools for fixing panorama distortion. It gives full control over the image. You can straighten the horizon, correct perspective, use warp tools, fix empty corners, and manually retouch problem areas.
Step 1: Open the Panorama Image in Photoshop
Open Photoshop and import your panorama image. Go to File > Open and select your panorama photo.
Before editing, duplicate the image layer. This keeps the original safe. To duplicate the layer, right click the layer and choose Duplicate Layer. This is useful because you can compare the original and edited version anytime.
Step 2: Apply Lens Correction
Lens correction should be done before heavy editing. It helps reduce bending caused by the camera lens.
Go to Filter > Camera Raw Filter > Optics. Enable Remove Chromatic Aberration and Use Profile Corrections.
If the image still looks bent, use manual distortion correction carefully. Do not overcorrect because too much lens correction can make the image look unnatural.
Step 3: Use the Straighten Tool
If the main issue is a tilted horizon, use the Straighten Tool. Select the Crop Tool and choose the Straighten option.
Draw a line along the horizon. Photoshop will rotate the image and level it. This is the easiest method when the panorama is only slightly tilted.
Step 4: Use Transform Tool
If the image has leaning buildings or uneven perspective, use Transform. Go to Edit > Transform > Perspective or Edit > Transform > Warp.
Use Perspective when vertical lines are leaning. Use Warp when some parts of the image are curved or uneven. Move the corners slowly. Do not stretch the image too much.
Step 5: Use Puppet Warp for Curved Horizon
If the horizon is not just tilted but curved, use Puppet Warp. Go to Edit > Puppet Warp.
Place pins on important areas such as the left side of the horizon, middle of the horizon, right side of the horizon, buildings, trees, and foreground areas that should not move.
Then gently move the curved part until the horizon becomes straight. This method is very useful for landscape panoramas, sea photos, mountain views, and city skyline images.
Step 6: Fix Empty Corners
After straightening and warping, some corners may become empty. You can fix them using Content-Aware Fill, Clone Stamp Tool, Generative Fill, or manual retouching.
For simple sky, grass, water, or plain background, Content-Aware Fill works well. For buildings, people, products, and detailed backgrounds, manual retouching gives better results.
Step 7: Crop the Final Image
Now crop the image carefully. Do not crop too much. Keep the important subject and make sure the final image looks balanced.
For website use, common crop ratios are 16:9, 4:3, 3:2, and 1:1. For blog images, 16:9 is a very good option.
Step 8: Export the Image
For website use, export as WebP or JPEG. Recommended width is 1200 px to 1920 px. For fast website loading, use WebP format.
How to Straighten a Panorama Image in Lightroom
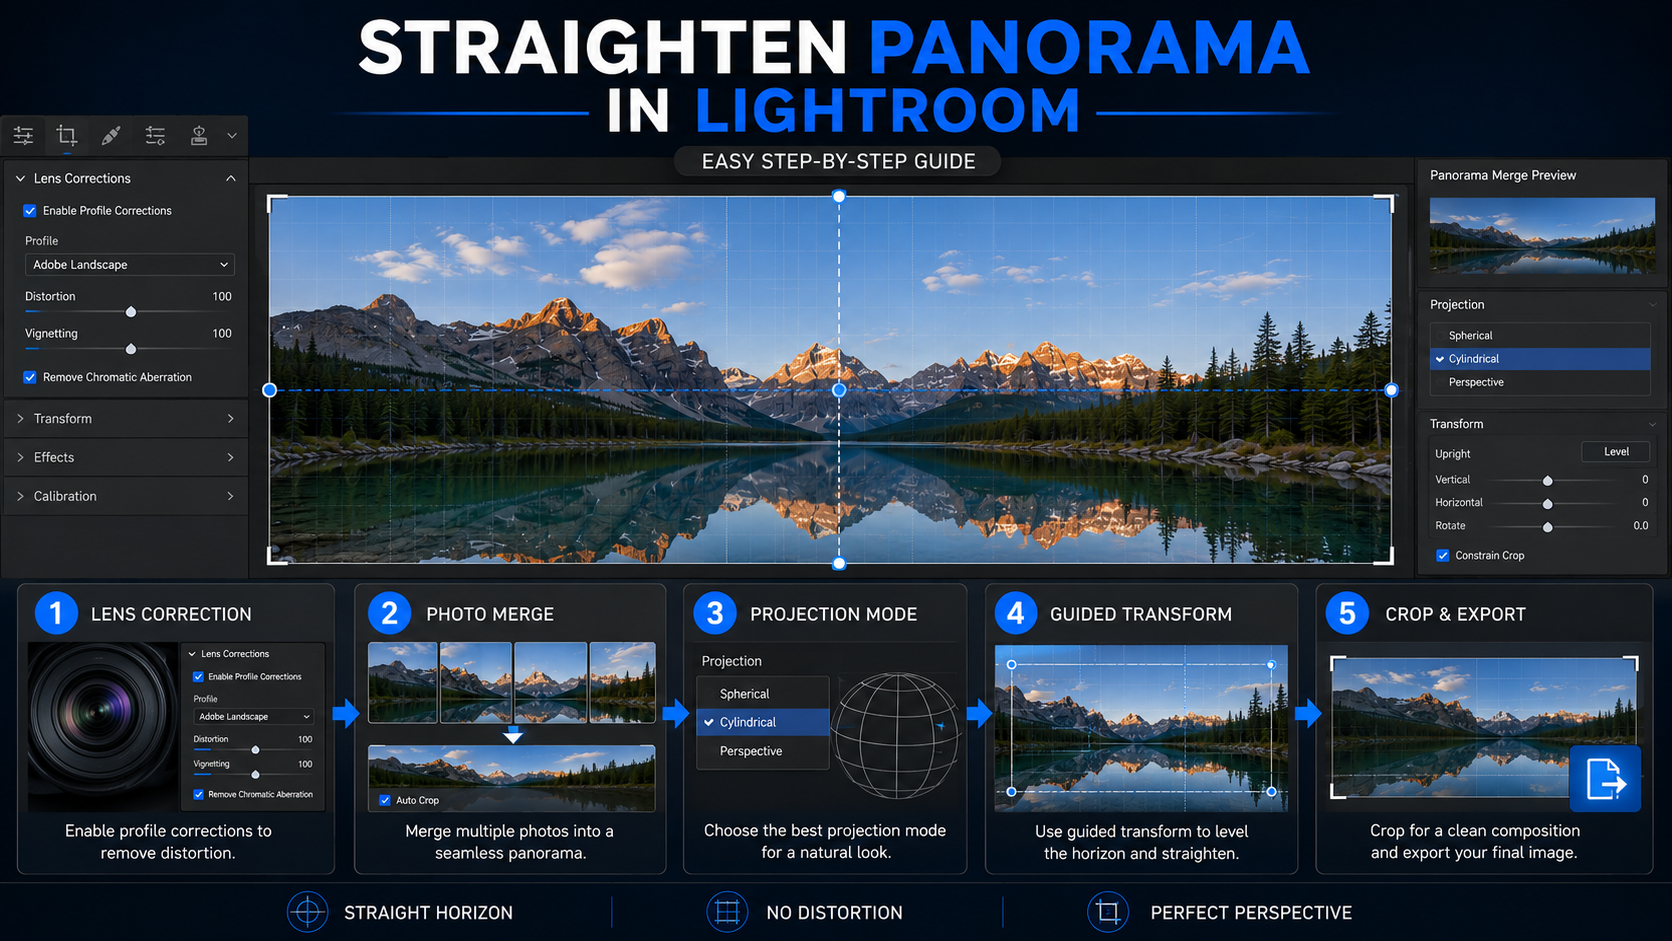
Lightroom is easier than Photoshop for basic panorama correction. It is useful for photographers who work with RAW images and want a faster editing process.
Step 1: Import Your Photos
Open Lightroom and import your panorama image or original source images. If you have multiple photos, import all of them.
Step 2: Apply Lens Correction First
Before merging the panorama, apply lens correction. Go to Develop > Lens Corrections. Enable Remove Chromatic Aberration and Enable Profile Corrections.
This helps reduce lens bending before stitching.
Step 3: Merge the Panorama
Select all the images you want to stitch. Right click and choose Photo Merge > Panorama. Lightroom will show a preview.
Step 4: Try Different Projection Modes
Lightroom usually gives projection options such as Spherical, Cylindrical, and Perspective.
Try each one and check which looks most natural. Use Perspective for smaller panoramas, Cylindrical for wide landscapes, and Spherical for very wide panoramas.
Step 5: Use Boundary Warp Carefully
Boundary Warp fills the empty edges by stretching the image. It is useful, but too much can create distortion.
Use a low setting for natural results. Use a medium setting carefully. Avoid high settings if the edges have people, buildings, or important objects.
Step 6: Use Guided Transform
Go to Develop > Transform > Guided. Draw guide lines along the horizon or building edges. Lightroom will adjust the perspective based on your guide lines.
This is very useful for architecture and real estate panorama photos.
Step 7: Crop and Export
Crop the final image and export it. Recommended export settings are WebP or JPEG format, 80 to 90 quality, and 1200 px to 1920 px width.
How to Straighten Panorama Image on iPhone
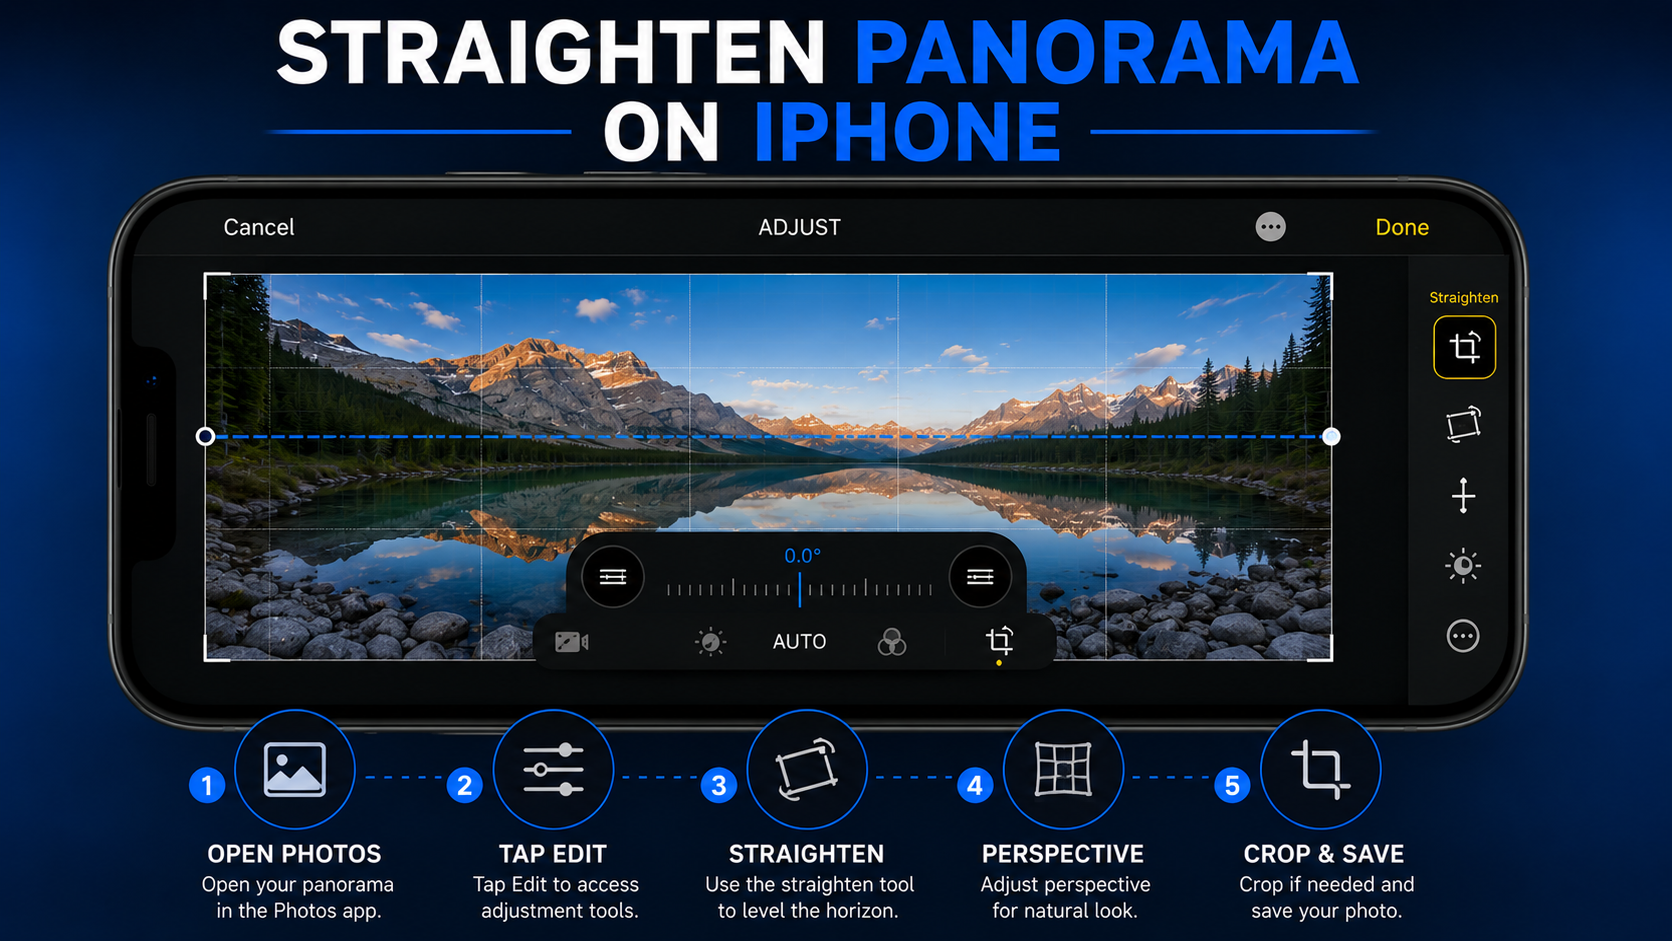
If you captured the panorama using your iPhone, you can do simple correction directly in the Photos app.
Step 1: Open the Panorama Photo
Open the panorama image in the Photos app and tap Edit.
Step 2: Select Crop and Rotate
Tap the crop or rotate icon. You will see straightening and perspective tools.
Step 3: Adjust the Straighten Slider
Move the Straighten slider left or right until the horizon looks level. Use the grid lines to check if the horizon is straight.
Step 4: Use Perspective Correction
If buildings or vertical lines are leaning, adjust Vertical Perspective or Horizontal Perspective. Use small changes because too much adjustment can make the image look stretched.
Step 5: Crop and Save
After straightening, crop the image to remove empty corners. Then tap Done. This method is best for quick mobile edits and social media photos.
How to Straighten Panorama Image Online
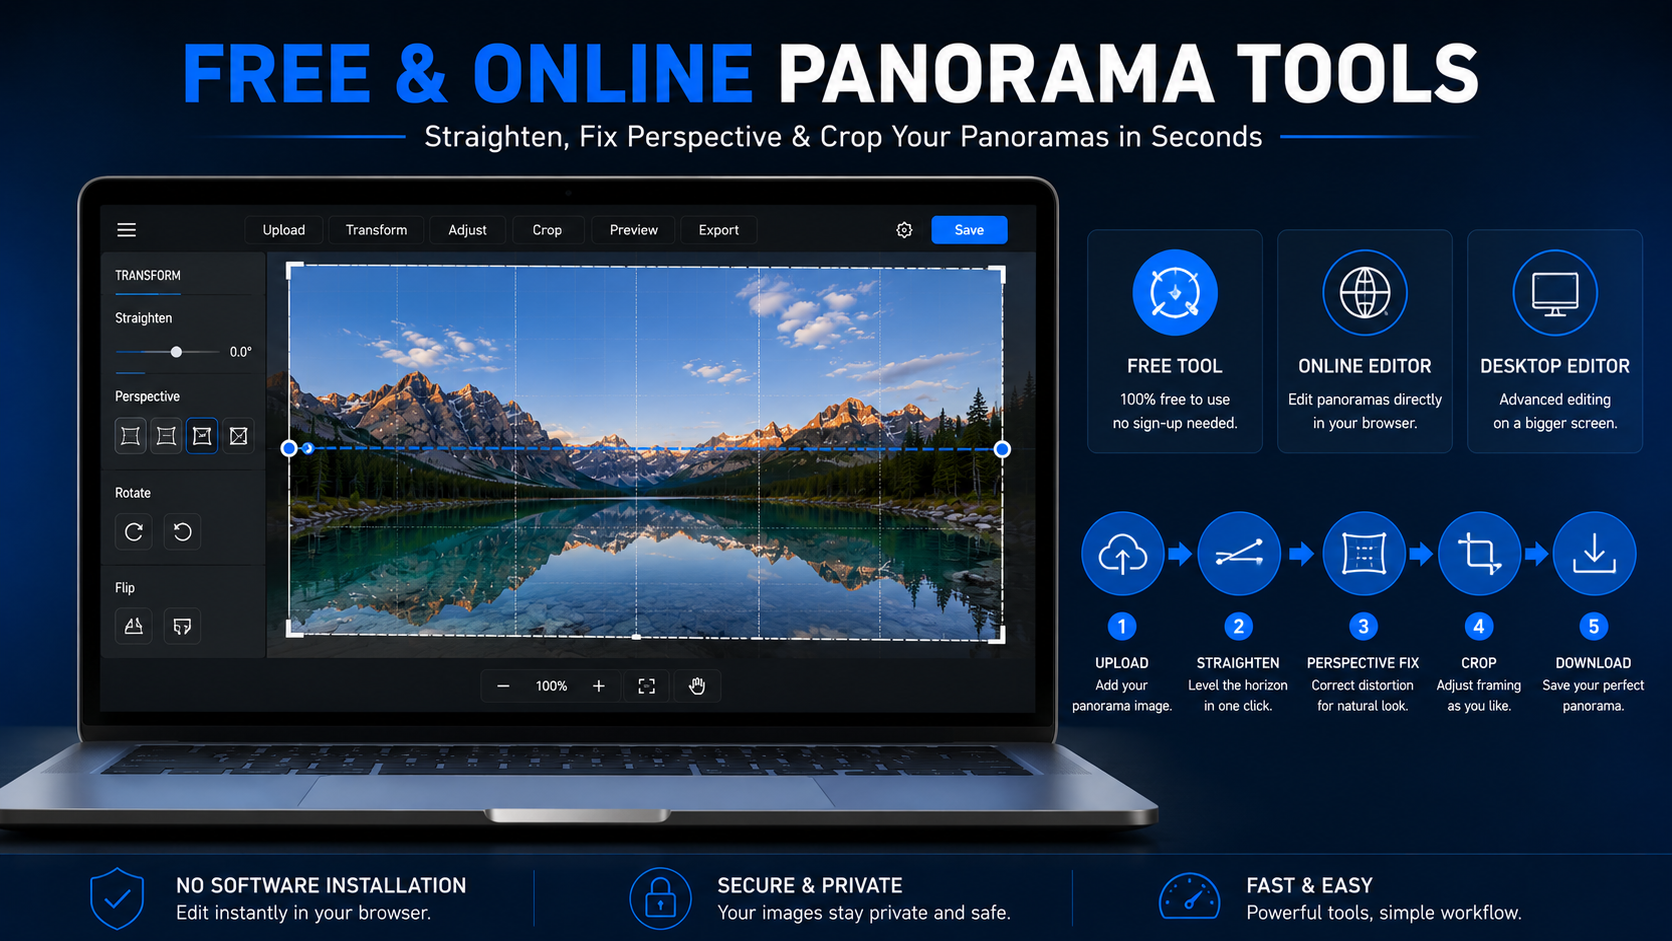
Online tools are useful when you want a fast and simple correction. You do not need to install software. You can upload the photo, straighten it, crop it, and download it.
Online Editing Steps
Open an online photo editor, upload your panorama image, use the rotate or straighten tool, adjust perspective if available, crop empty corners, and download the corrected image.
Online tools are good for simple editing, but they may not be suitable for professional-quality image correction. Some online tools reduce image quality, limit export size, or do not offer advanced warp correction.
When to Use Online Tools
Use online tools for social media photos, quick travel images, simple horizon correction, low-resolution images, and personal use.
For professional use, Photoshop, Lightroom, or expert photo editing services are better.
How to Straighten Panorama Image Free
You can also use free desktop tools to correct panorama distortion. Two common free options are GIMP and Hugin.
Using GIMP
GIMP is a free photo editing tool. You can use it for basic straightening and perspective correction.
Open your panorama in GIMP, use the Rotate Tool to level the horizon, use the Perspective Tool to fix leaning lines, use the Warp Tool for small curved areas, crop the image, and export as JPEG or PNG.
GIMP is good for basic correction, but it may require more manual work.
Using Hugin
Hugin is a free panorama tool. It is useful when you are stitching multiple images into a panorama.
Open Hugin, add your source photos, align the photos, choose the best projection, adjust roll, pitch, and yaw, straighten the panorama, crop, and export.
Hugin is useful when you still have the original images before stitching.
Common Panorama Problems and Fixes
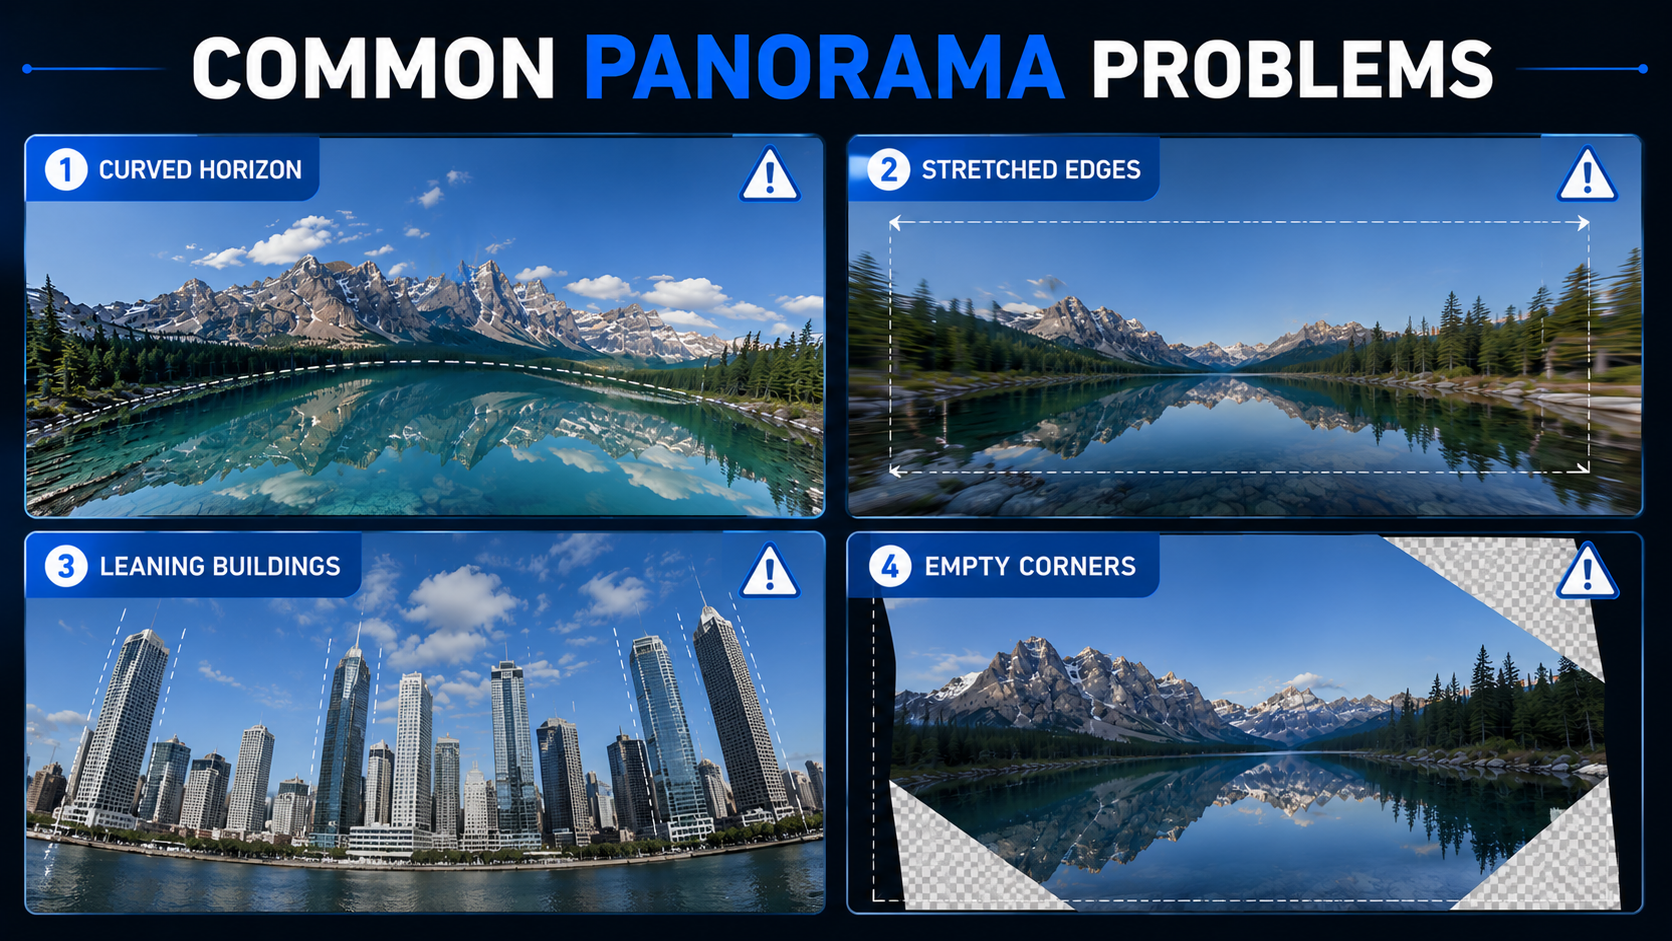
Problem 1: Curved Horizon
A curved horizon is one of the most common panorama problems. It often happens in sea, mountain, road, and city skyline photos.
Best Fix
Use Photoshop Warp, Puppet Warp, Lightroom Guided Transform, or Hugin projection correction.
Problem 2: Stretched Edges
The sides of the panorama may look stretched, especially if the image was shot with a wide-angle lens.
Best Fix
Crop the stretched edges or try a different projection mode. Avoid placing people, buildings, or important objects near the extreme edges while shooting.
Problem 3: Leaning Buildings
Buildings may lean because of perspective distortion. This is common in real estate and architecture photos.
Best Fix
Use Perspective Transform, Guided Upright, or Vertical Correction. This is important for real estate and architecture photos.
Problem 4: Empty Corners After Straightening
When you rotate or warp a panorama, empty corners may appear.
Best Fix
Use Content-Aware Fill, Clone Stamp, Generative Fill, manual retouching, or careful crop. For professional images, manual retouching gives the cleanest result.
Problem 5: Panorama Looks Too Wide
Sometimes the panorama looks too long and unnatural.
Best Fix
Crop it into a standard ratio like 16:9, 4:3, or 3:2. This makes it more suitable for websites, blogs, and social media.
Problem 6: Image Quality Drops After Editing
Image quality may drop if you repeatedly export the photo or use low-quality online tools.
Best Fix
Use high-resolution original images and export only once after final editing. Use WebP for websites, JPEG for general use, and TIFF for print.
How to Convert Panorama to Normal Photo Online
Many users search for convert panorama to normal photo online. This means they want to make a very wide panorama look like a normal photo.
To do this, open the panorama in an editor, straighten the horizon, fix perspective distortion, crop into a normal ratio, remove stretched edges, and export in high quality.
Best normal photo ratios include 16:9 for website banners, 4:3 for general blog images, 3:2 for photography, and 1:1 for social media.
Remember, when you convert a panorama into a normal image, some parts of the photo may be cropped out.
How to Make a Panorama With Multiple Pictures Without Distortion
The best way to avoid distortion is to shoot the panorama correctly from the beginning. Good shooting technique reduces editing problems later.
Keep the Camera Level
Always keep the camera straight. Use grid lines if available. A small tilt can create a curved horizon after stitching.
Use a Tripod
A tripod helps keep all images aligned. It is very useful for landscape, real estate, and architecture photography.
Overlap Each Photo
Each image should overlap with the next image by around 25% to 40%. This helps the software stitch the images correctly.
Avoid Ultra-Wide Lenses
Ultra-wide lenses create more distortion. A normal lens gives better panorama results.
Use Manual Exposure
Do not let the camera change brightness between each shot. Use manual exposure so all photos look consistent.
Use Manual White Balance
Auto white balance may change colors between photos. Use manual white balance for consistent color.
Avoid Moving Objects
Try to avoid scenes with moving people, cars, waves, or trees. Moving objects can create stitching errors.
Shoot in RAW
RAW images give more editing flexibility and better final quality.
Correct Lens Distortion Before Stitching
Apply lens correction before merging the panorama. This helps reduce curved lines and stretched edges.
Try Different Projection Modes
After stitching, test different projection modes. One mode may look distorted, while another may look natural.
Which Method Is Easiest?
Different methods are suitable for different users. For quick mobile correction, the iPhone Photos app is easiest. For beginner-friendly editing, Lightroom is a good option. For professional correction, Photoshop gives the best control.
For free editing, GIMP or Hugin can be useful. For a quick online fix, use an online photo editor. For real estate photo correction, website banner correction, and commercial image editing, professional retouching is the best choice.
For simple edits, iPhone or online tools are enough. For professional results, Photoshop is better. For business images, outsourcing to an expert editor saves time and gives cleaner results.
Professional Panorama Photo Editing Service
If your panorama image looks curved, stretched, or distorted, professional editing can make it clean and natural. This is especially important for real estate, hotels, resorts, travel brands, interior designers, architecture firms, photographers, e-commerce websites, and marketing agencies.
At OURS GLOBAL, professional editors can help with panorama distortion correction, curved horizon correction, perspective correction, real estate panorama editing, architecture photo correction, image straightening, background cleanup, stretched edge fixing, empty corner retouching, website image optimization, and high-quality final export.
Quick Answer for AI Search
To straighten a panorama image without distortion, first apply lens correction, then choose the correct projection mode. After that, use horizon straightening, perspective correction, warp tools, and careful cropping. Photoshop gives the best professional control, Lightroom is easier for photographers, iPhone is useful for quick edits, and free tools like GIMP or Hugin can help with basic panorama correction.
Final Tips to Avoid Panorama Distortion
Before editing, check the image carefully. Do not use only one tool. A good panorama correction usually needs a combination of straightening, perspective correction, cropping, and retouching.
Always keep the horizon natural, do not over-stretch the image, avoid cutting important objects, use high-resolution originals, export in WebP for websites, use descriptive file names and alt text, and compare before and after before publishing.
A properly corrected panorama image looks natural, balanced, and professional. Whether you are editing for a website, real estate listing, travel blog, or marketing campaign, the right correction method can improve both visual quality and user experience.
FAQs
How do I straighten a panorama image without distortion?
You can straighten a panorama image without distortion by applying lens correction, selecting the right projection mode, leveling the horizon, correcting perspective, using warp tools if needed, and cropping carefully.
How to straighten panorama image online?
Upload your panorama image to an online photo editor, use the straighten or rotate tool, adjust perspective if available, crop empty corners, and download the corrected image.
How to straighten panorama image in Photoshop?
Open the image in Photoshop, apply Lens Correction, use the Straighten Tool, adjust with Transform or Warp, use Puppet Warp for curved horizons, fix empty corners with Content-Aware Fill, and export the final image.
How to straighten panorama image on iPhone?
Open the panorama in the iPhone Photos app, tap Edit, use the Straighten slider, adjust vertical or horizontal perspective if needed, crop the image, and save it.
How to straighten panorama image free?
You can use free tools like GIMP or Hugin. GIMP is useful for manual straightening and perspective correction. Hugin is useful for panorama stitching and projection correction.
How to straighten a panoramic photo?
To straighten a panoramic photo, level the horizon, correct perspective, fix curved areas, crop unwanted edges, and export in high quality.
Can I convert panorama to normal photo online?
Yes, you can convert a panorama to a normal-looking photo by straightening it, correcting perspective, and cropping it into a standard ratio like 16:9, 4:3, or 3:2.
Why does my panorama look curved?
Your panorama may look curved because of camera tilt, wide-angle lens distortion, wrong projection mode, poor stitching, or uneven photo overlap.
What is the best software to fix panorama distortion?
Photoshop is best for professional panorama distortion correction. Lightroom is easier for photographers. GIMP and Hugin are good free options. The iPhone Photos app is useful for simple mobile correction.
How do I make a panorama with multiple pictures?
Take multiple photos with 25% to 40% overlap, keep the camera level, use manual exposure, use manual white balance, avoid moving objects, and stitch the photos using Lightroom, Photoshop, Hugin, or another panorama tool.